Setting up Google Analytics (GA) is the first step to learn everything about the ways the visitors are interacting with your website. You can know the type of people that are visiting your website, their behavior while exploring your website, the type of content they want to see from your website, etc. And the best part is that Google provides this tool absolutely free. There are a lot of benefits of using this free tool by Google. But to get all these benefits, you need to install and set up this on your website. So here in this blog, we are going to share everything you need to know about this tool, its benefits, steps to set up and installation, etc. A bonus would be some tips on the same by the leading digital marketing company in India. So keep on reading!
Benefits of Using Google Analytics
Google Analytics or GA is a very powerful tool for websites. More than 56% of websites are using this tool to extract information about their visitors (source: Dilate). The numbers are increasing day by day and the reasons are that with GA you can check:
- How much website traffic you get
- How much traffic each of the pages on your website gets
- Which websites the traffic on your website is coming from
- Which keywords drive more traffic to your website
- How many leads your website convert
- Important demographic information about your website visitors
- The geographic region of the visitors to your website
- Wherefrom the website traffic is coming – mobile devices or websites, etc.
So once you get all the information you can use them to evaluate and track your website traffic goals and start making more valuable business decisions. Let’s now check the steps to install Google Analytics on your website and start using it to get the best website results.
How to Install Google Analytics in 3 Simple Steps
Setting up GA can be a bit tricky but the information you’ll get from the tool is invaluable. So to install GA on your website like a pro just follow the steps below.
- Create a New Google Account or Use the One You Already Have
For setting up the Google Analytics tool, you would need a Google Account. So if you have an existing Google account, you can skip this step. But if you haven’t any such account, you need to create one. Fill up the information on the page and proceed to the next step.
- Use the Google Account to Set Up Google Analytics
Now that you have created your Google account, visit the website: http://www.google.com/analytics/. Then click on “Access Google Analytics” in the top right corner of the page. This will take you to another page where you’ll find the “Sign Up” button on the right-hand side. Remember to select “Website” at the top if you are setting up GA for a website.
Then you need to fill out all the information required like Name of the Account, Name of the Company, Website URL, Category of the Industry, Reporting Time Zone, etc. As you fill out the details, click on the blue “Get Tracking ID” button at the bottom of the page. Then as you accept the GA terms of service agreement to proceed further, you’ll get a unique code. You have to save this code to apply it on the website.
- Install the Tracking Code
GA can report you back on a variety of website metrics. But to enable this, you need to install the tracking code on each of your website pages. For this, just copy and paste the code to the header or footer file of your website. For adding the code to the header file, make sure the code is put before the closing </head> tag. In case you are adding the code to the footer file, make sure you put the code before the closing </html> tag. This tracking code should be installed on each of your website pages. Here one thing you need to keep in mind is that after 24 hours of code installation you’ll be able to collect data on the website. If you can’t install the tracking code yourself, you opt for the top SEO services in Mumbai.
Learn to Use Google Analytics
So now that you have installed the GA on your website, you need to learn to use it properly. This way you will be able to make the most of this powerful tool. You need to link your google ads to your GA tool. This way you will get all the insights on how your audiences are interacting with your ads and site. So to enable this, you just need to go to the dashboard and find the link to Google Ads.
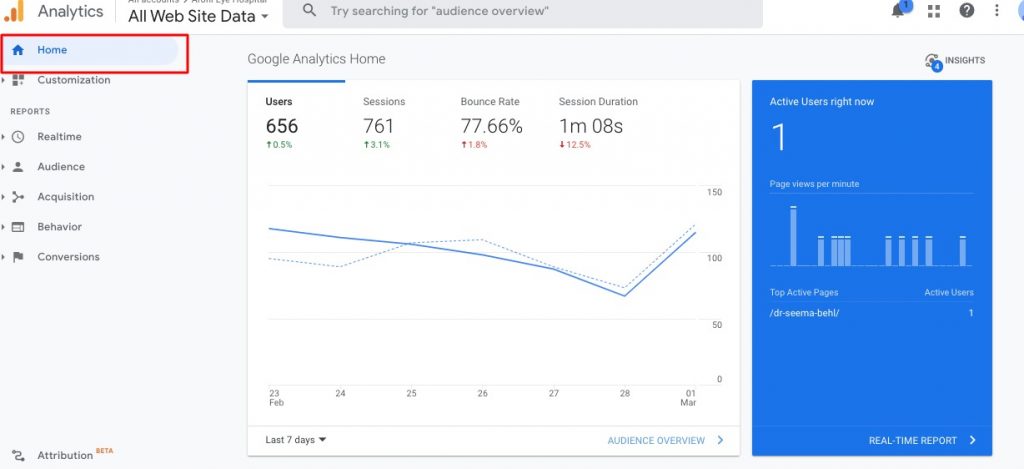
The below image is how your GA dashboard will look.

On this above image, you can see there are five sections on the left-hand side of the dashboard, Realtime, Audience, Acquisition, Behaviour, and Conversions. Realtime shows the number of real-time users present on your website.
Then comes the Audience section, which is the group of website visitors with shared features like gender, demographics, device type, or browsing behavior.
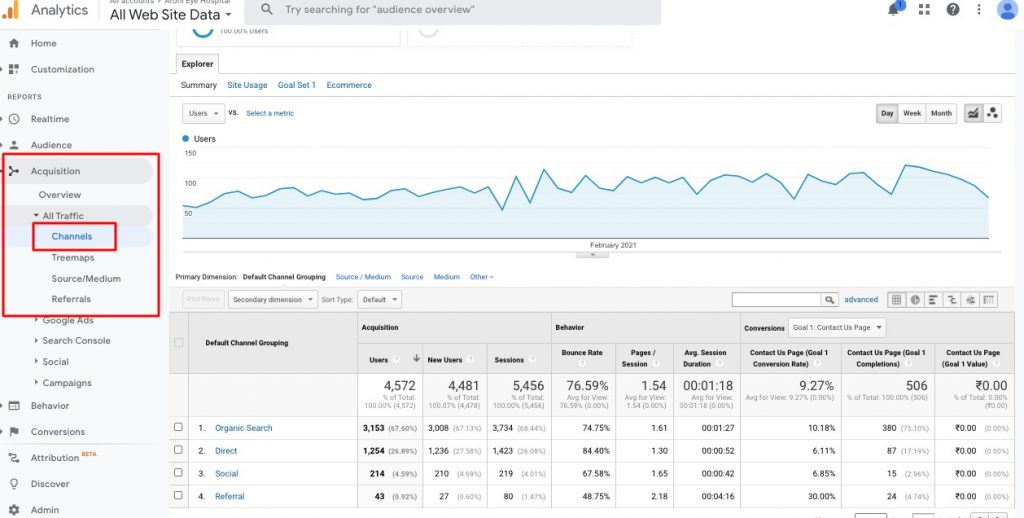
The Acquisition section shows the users, new users, and sessions. Also, here you can monitor from where the users are coming like the Channels – organic, social, direct, and referral. Have a look at the below image for the same.

The Behaviour section reveals how your visitors behave on your website. In fact, this section shows the web pages the user’s visit and the actions they take while they are on it.
Again, under the Conversion section, you can track the percentage of visitors that take the desired action on your website. You’ll be able to see the audiences that shop on your website or convert from visitors to customers. Here’s the difference between digital marketing & traditional marketing. Unlike traditional mode, digital marketing enables you to track your efforts and make necessary changes whenever it is required.
Final Take
So this is the expert guide on the installation and use of Google Analytics on your website. Use this powerful tool to monitor your website’s performance and make the most of your marketing efforts easily. For more detailed information, Get in Touch with us.

